How to Set up Preferences in MYOB Premier
Setting up Preferences in MYOB Premier
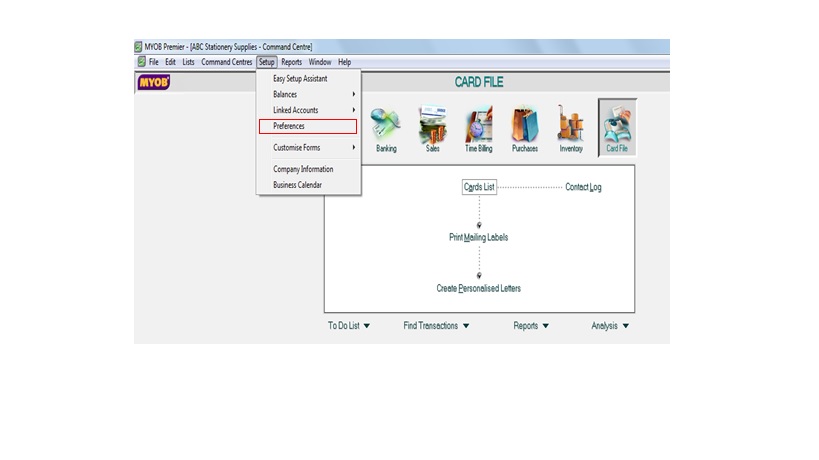
MYOB Premier allows users to customize settings on how to use MYOB. To setup Preferences, go to Setup, then choose Preferences. The following screen appears:

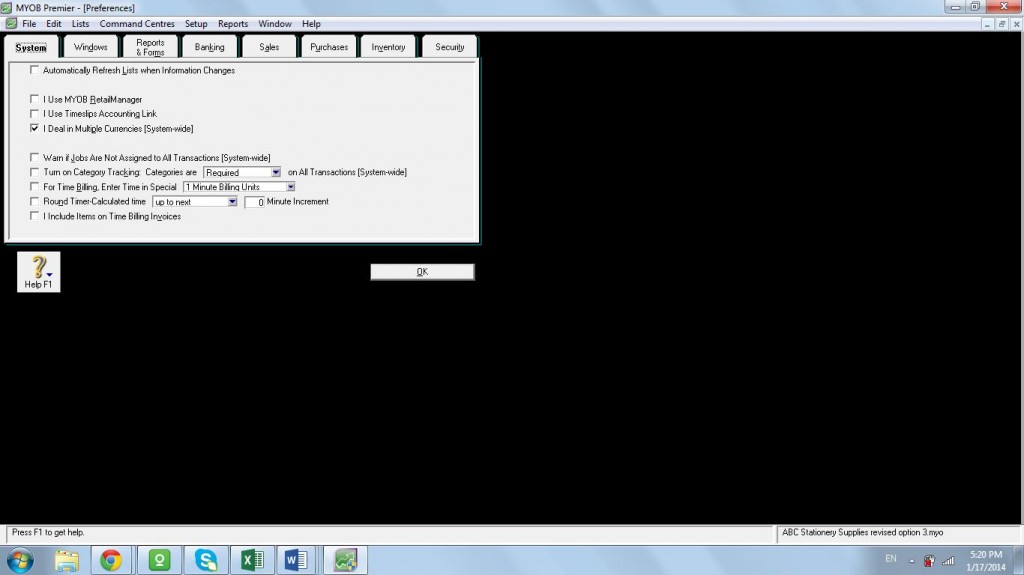
The following are the eight (8) preferences tab that you can set up and customise by using Preferences:
- System
- Windows
- Reports & Forms
- Banking
- Sales
- Purchases
- Inventory
- Security
Now, let’s discuss the first tab:
- Setting up System Preferences by clicking on the tab as follows:

Once clicked on the left-hand portion on the box, this will trigger a check mark and the System tab allows users to:
1.1. Automate refresh of Lists when Information Changes
1.2. If you are using MYOB Retail Manager, you have to click on the left hand
1.3. Allow user of Multiple Currencies (System-wide)
1.4. Warn if Jobs are not assigned to all Transactions (System-wide)
1.5. Turn on Category Tracking Categories and Require categories on All Transactions (System-wide)
1.6. Provide for Time Billing to Enter Time in Special units of time, like interval of 1 minute, 5 minutes, 6 minutes, 12 minutes, 15 minutes, 20 minutes, 30 minutes Time Billing Units
1.7. Allows to Round Timer-calculated time up to set minutes increment
1.8. Allows Users to include items on Time Billing Invoices
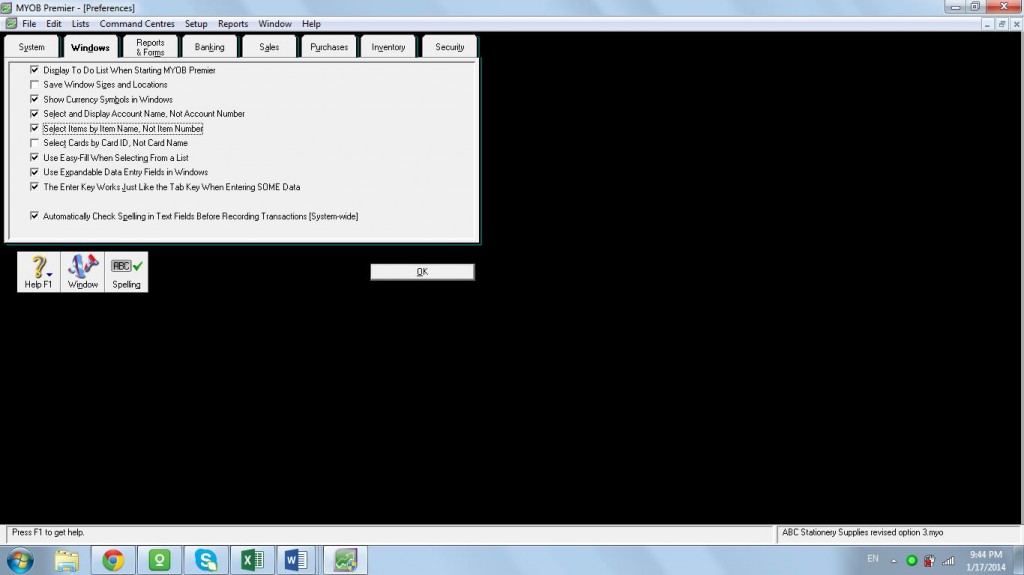
2. Now, let’s go to Windows tab in the Preferences setup. The following screen appears:

By clicking on the left hand portion of the box, a check mark will appear to customize the following:
2.1. Display To Do List when Starting MYOB Premier – once this is clicked, To Do List will pop-up and display once MYOB Premier is started. To recap, MYOB allows users to enter To Do activities which is located in the bottom of each command centre. If you do not click to display To Do List when starting MYOB, the activities entered in MYOB will not display.
2.2. Save Windows Sizes and Locations
2.3. Show Currency Symbols in Windows
2.4. Select and Display Account Name, Not Account Number – most often, it is more convenient to display account name than by account number when making account entries in MYOB. Click on this option so that Windows will display by account name and it would be easier for you to do so.
2.5. Select Items by Item Name, not by Item Number – again, it is usually more convenient to enter items by name, rather than by item number. Click on this option so that Windows will display by item name than by item number.
2.6. Select Cards by Card ID, not Card Name
2.7. Use Easy-Fill When Selecting from a List – when you choose to setup this preference, MYOB will allow you to enter account names, account numbers, item names, item numbers and card names that you always enter in MYOB and automatically enter the data once recognized.
2.8. Use Expandable Data Entry Fields in Windows – this allows you to enter long information when you are entering purchases, invoices and also enable you to view its long description as well.
2.9. The Enter Key Works Just like the Tab Key when Entering Some Data
2.10. Automatically Check Spelling in Text Fields Before Recording Transactions
For setup of Preferences on Reports and Forms, Banking, Sales, Purchases, Inventory and Security, go to the corresponding tab to setup the preferences. MYOB Premier is designed to be user-friendly and the field description for the preferences setup so easy to understand.